SQL Server Containers and SQL Server on Linux Now Available on Windows via WSL!
January 2, 2025Automating Logic Apps connections to Dynamics 365 using Bicep
January 3, 2025Happy 2025 everyone! To celebrate the new year I wanted to share an experiment I’ve recently been working on with you all.
A short a while ago I was in talks with a customer and they asked me if it was possible to create a power app which would search through a library containing data for a specific system. I told them that wouldn’t be a problem, but then they asked if it would be possible to also on synonyms and words which are contextually the same.
To tackle this problem I considered a few options. First I thought of using the new power pages with AI search. But as this was still in preview and I didn’t have much control over which data it would or wouldn’t search I didn’t find it a good solution.
I considered using the Dataverse relevance search option in the power platform. But it would require me to set up a copy/mirror of the data in the Dataverse and I couldn’t find easy solutions to use this in a canvas app (although they might be there). Also I prefer to have more control over what happens when possible.
So in the end I decided to figure out if it was possible to utilize the power of Azure AI Search. Although nowadays it looks like everything needs to be solved with AI in this case I though it might be a good application of AI. A large language model is very good in figuring out which words are contextually close together, so if this can be used in a way to determine which content matches a specific search query best that would solve the problem.
Azure AI Search offers more then one way to achieve this. I’ve looked into using the semantic ranker in Azure AI Search to solve this problem. But when using this I noticed that search queries which only contained single words sometimes had issues being interpreted well. So in the end I went with the vector search option in Azure AI Search.
Vector search is a technique whereby the content is represented in a multi dimensional vector which effectively is a large amount of numbers. By comparing these numbers together and calculating the difference between these vectors similarity can be observed.
For this experiment I wanted to create a search app for my own blog. As I use Squarespace for my blog I can easily retrieve all the (meta)data of my blog in JSON format. This can be compared to the output of an API, so for this experiment it’s nicely suited. First off I need to create an Azure AI Search resource in Azure and create a index. For my experiment I’m using a free tier Azure AI service. If you want to use this in production workloads I recommend using a higher tier.

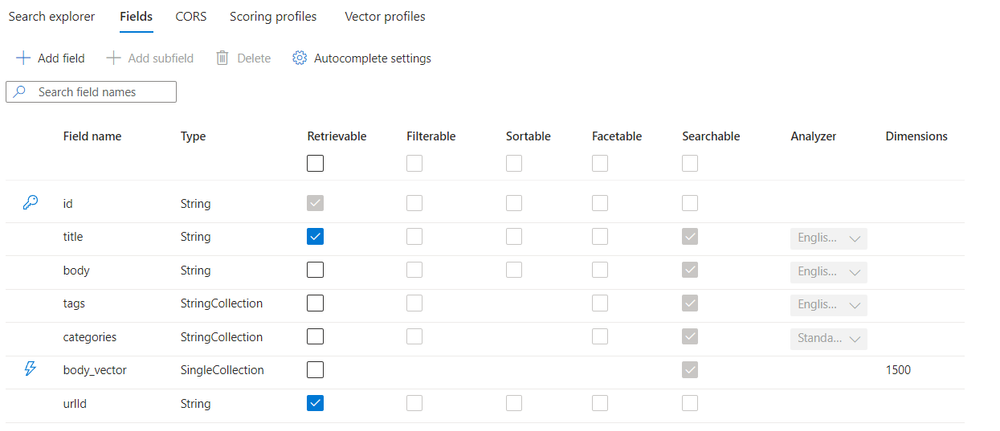
As an experiment I set the dimensions of the body_vector to 1500 so you can see where this setting is used, I would recommend to normally keep this at the default. You can create these fields with the portal or by using a JSON. I will share my JSON later in this blog because first the index also needs a vectorizer. To set this up I had to create a Azure OpenAI resource and create a deployment in there. By open the Azure AI Foundry from the link in the resource I could go to deployments and deploy a base model there. I chose to use the “text-embedding-3-small” model as this is one which is supported by Azure AI Search. When I was doing this West Europe had some issues with it’s capacity so I had to create this all in East US as not all regions support these resources yet. So keep this in mind when planning your solution.

So after setting this all up my JSON looks like this:
{
“name”: “autosysopsblog”,
“fields”: [
{
“name”: “id”,
“type”: “Edm.String”,
“key”: true,
“retrievable”: true,
“stored”: true,
“searchable”: false,
“filterable”: false,
“sortable”: false,
“facetable”: false,
“synonymMaps”: []
},
{
“name”: “title”,
“type”: “Edm.String”,
“key”: false,
“retrievable”: true,
“stored”: true,
“searchable”: true,
“filterable”: false,
“sortable”: false,
“facetable”: false,
“analyzer”: “en.microsoft”,
“synonymMaps”: []
},
{
“name”: “body”,
“type”: “Edm.String”,
“key”: false,
“retrievable”: false,
“stored”: true,
“searchable”: true,
“filterable”: false,
“sortable”: false,
“facetable”: false,
“analyzer”: “en.microsoft”,
“synonymMaps”: []
},
{
“name”: “tags”,
“type”: “Collection(Edm.String)”,
“key”: false,
“retrievable”: false,
“stored”: true,
“searchable”: true,
“filterable”: false,
“sortable”: false,
“facetable”: false,
“analyzer”: “en.microsoft”,
“synonymMaps”: []
},
{
“name”: “categories”,
“type”: “Collection(Edm.String)”,
“key”: false,
“retrievable”: false,
“stored”: true,
“searchable”: true,
“filterable”: false,
“sortable”: false,
“facetable”: false,
“analyzer”: “standard.lucene”,
“synonymMaps”: []
},
{
“name”: “body_vector”,
“type”: “Collection(Edm.Single)”,
“key”: false,
“retrievable”: false,
“stored”: true,
“searchable”: true,
“filterable”: false,
“sortable”: false,
“facetable”: false,
“synonymMaps”: [],
“dimensions”: 1500,
“vectorSearchProfile”: “vector-profile-1734677722043”
},
{
“name”: “urlId”,
“type”: “Edm.String”,
“key”: false,
“retrievable”: true,
“stored”: true,
“searchable”: false,
“filterable”: false,
“sortable”: false,
“facetable”: false,
“synonymMaps”: []
}
],
“scoringProfiles”: [],
“suggesters”: [],
“analyzers”: [],
“tokenizers”: [],
“tokenFilters”: [],
“charFilters”: [],
“normalizers”: [],
“similarity”: {
“@odata.type”: “#Microsoft.Azure.Search.BM25Similarity”
},
“vectorSearch”: {
“algorithms”: [
{
“name”: “vector-config-1734676869348”,
“kind”: “hnsw”,
“hnswParameters”: {
“m”: 4,
“efConstruction”: 400,
“efSearch”: 500,
“metric”: “cosine”
}
}
],
“profiles”: [
{
“name”: “vector-profile-1734677722043”,
“algorithm”: “vector-config-1734676869348”,
“vectorizer”: “vectorizer-1734735738306”
}
],
“vectorizers”: [
{
“name”: “vectorizer-1734735738306”,
“kind”: “azureOpenAI”,
“azureOpenAIParameters”: {
“resourceUri”: “https://autosysopsopenai.openai.azure.com”,
“deploymentId”: “text-embedding-3-small”,
“apiKey”: “”,
“modelName”: “text-embedding-3-small”
}
}
],
“compressions”: []
},
“@odata.etag”: “”0x8DD29AAC353EE87″”
}
With the index created it’s now time to fill this. Eventually I want to do this using a power automate flow or a logic app. But for now I used PowerShell to fill the index. You can use a REST API to fill the index. To do this I’ve created this PowerShell script:
# Blog Info
$url = “https://autosysops.com/blog/?format=json-pretty&offset=”
$offset = “”
# AI Search Info
$aisearch = “aisearchdemoautosysops”
$indexname = “autosysopsblog”
$key = “”
$indexurl = “https://$aisearch.search.windows.net/indexes/$indexname/docs/index?api-version=2024-07-01”
# OpenAI Info
$embedurl = “https://autosysopsopenai.openai.azure.com/openai/deployments/text-embedding-3-small/embeddings?api-version=2023-05-15”
$openaikey = “”
# Build Header for OpenAI Calls
$openaiheaders = @{
‘api-key’ = $openaikey
‘Content-Type’ = ‘application/json’
‘Accept’ = ‘application/json’
}
# Create an array to store the index values
$index = @()
# Retrieve all blogposts and store the relevant fields in the index
do {
# Get the JSON with the blog posts (limited to certain amount)
$blog = Invoke-RestMethod -Uri ($url+$offset) -Method Get
foreach($post in $blog.items) {
# Parse html
$HTML = New-Object -Com “HTMLFile”
[string]$htmlbody = $post.body
$HTML.write([ref]$htmlbody)
# Create a body for the OpenAI call
$openaibody = @{
‘input’ = $HTML.body.outertext
‘user’ = “IndexScript”
‘dimensions’ = 1500
}
# Send the body to OpenAI to get a vectorized representation back
$embedding = Invoke-RestMethod -Uri $embedurl -Headers $openaiheaders -Method Post -Body ($openaibody | ConvertTo-Json -Depth 5)
# Store in array
$index += [PSCustomObject]@{
“@search.action” = “upload”
“id” = $post.id
“title” = $post.title
“body” = $HTML.body.outertext
“tags” = $post.tags
“categories” = $post.categories
“body_vector” = $embedding.data.embedding
“urlId” = $post.urlId
}
}
#Set the offset to the next page value
$offset = $blog.pagination.nextPageOffset
} while($blog.pagination.nextPage)
# Set the header for the Azure AI Search call
$headers = @{
‘api-key’ = $key
‘Content-Type’ = ‘application/json’
‘Accept’ = ‘application/json’
}
# Send the info to the index
Invoke-RestMethod -Uri $indexurl -Headers $headers -Method Post -Body (@{“value” = $index} | ConvertTo-Json -Depth 5)
This script will only work on Windows instances of PowerShell but for me that was no issue. I had to use the htmlfile object because the API returned the content of my blogpost as a HTML file with formatting. To only keep the text I used this trick to easily strip away all HTML formatting.
To get a vector representation of the blog content I use the embedding API from the Azure OpenAI service. This allows me to send a string and get a vector representation in back. When doing this for a production workload it would be best to separate the content in multiple chunks which are analyzed. The vector index field allows for multiple pages being stored.
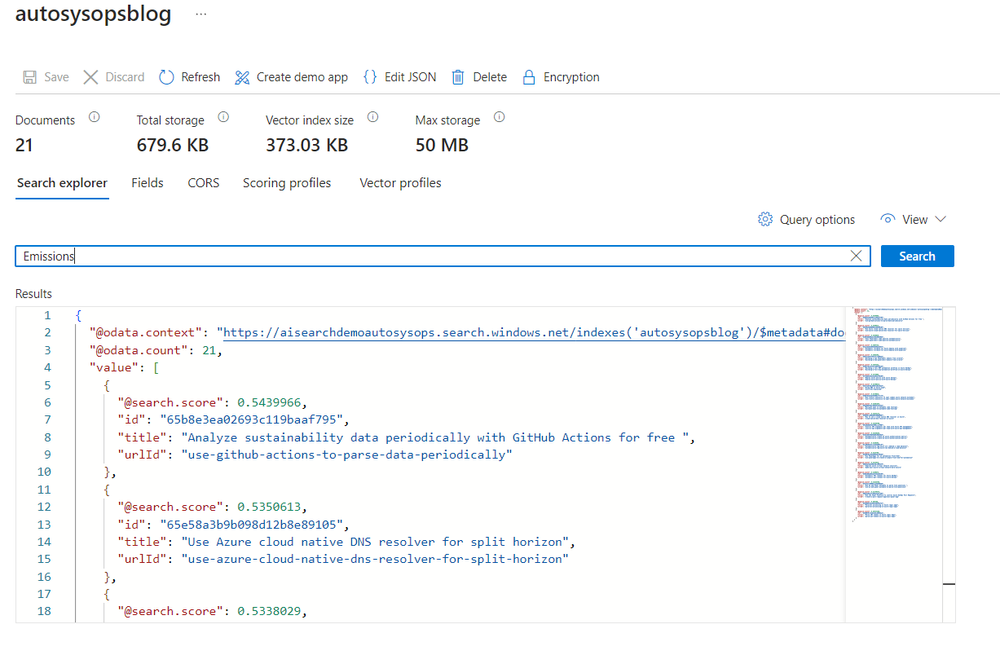
With the index filled you can now try the search in the portal:

Here you can see that I search for the word “emissions” which is not mentioned in my blogposts, still it was able to first show the blogpost which focusses on sustainability. A higher score means that the values where closer together.
Now the next step is to get this into a power app. To check how I could do this I first tried to do the same search query with PowerShell. That resulted in this script:
$uri = “https://aisearchdemoautosysops.search.windows.net/indexes/autosysopsblog/docs/search?api-version=2024-11-01-preview”
$key = “”
$body = @{
“count” = $true
“vectorQueries” = @(
@{
“kind”= “text”
“text”= “Azure API Management”
“fields”= “body_vector”
}
)
}
$headers = @{
‘api-key’ = $key
‘Content-Type’ = ‘application/json’
}
Invoke-RestMethod -Uri $uri -Headers $headers -Method Post -Body ($body | ConvertTo-Json -Depth 5)
To make this into a power app I’ve created a blank canvas app and in there made a Power Automate flow. This is how the flow looks:

If you want to use this in a production environment I recommend not putting the API key in plain text in the connector. Use safe best practices for this.
As you see the flow has an input and output. The input is the search term that needs to be searched for and the output is the JSON answer from azure AI search.
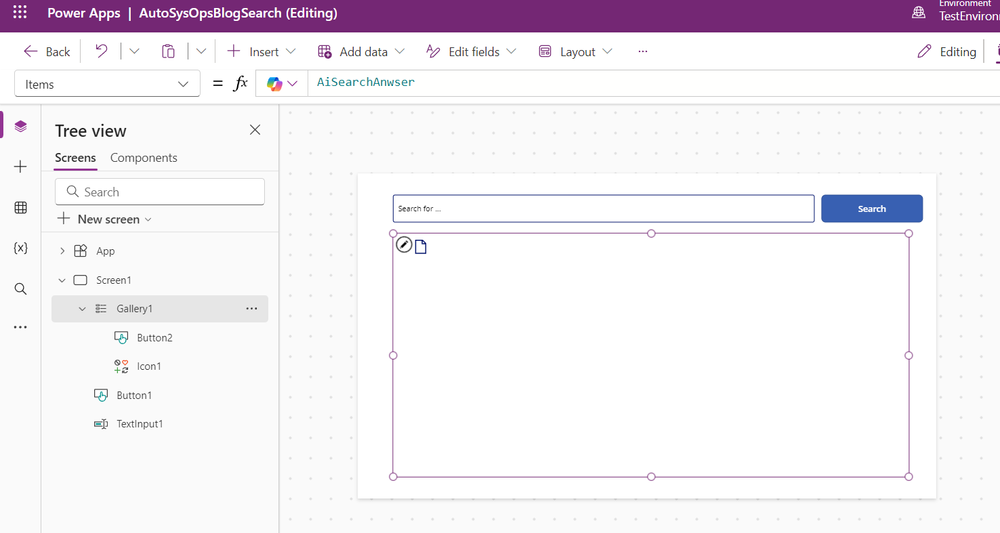
Now I create a very simple Power App with a textinput field, a button and a vertical gallery.

For the search button I set the onselect event to this code:
Set(AiSearchAnwser,
ForAll(
Table(ParseJSON(SearchAISearch.Run(TextInput1.Text).answer).value),
{
id:Text(Value.id),
title:Text(Value.title),
urlId:Text(Value.urlId)
}
)
)
The “AiSearchAnswer” is the name of a variable I picked and can be any value. The SearchAISearch is the name of the flow I’ve created. This flow has the “run” method which will trigger the flow with the input specified. For this input I’ve selected the text in the textinput.
To make sure the results can be displayed I use the ForAll function to get all the values from the JSON returned by Azure AI search and store them in a table with the columns id, title and urlId.
Inside the vertical gallery I’ve created a button which has the onselect action of:
Launch(“https://autosysops.com/blog/”&ThisItem.urlId)
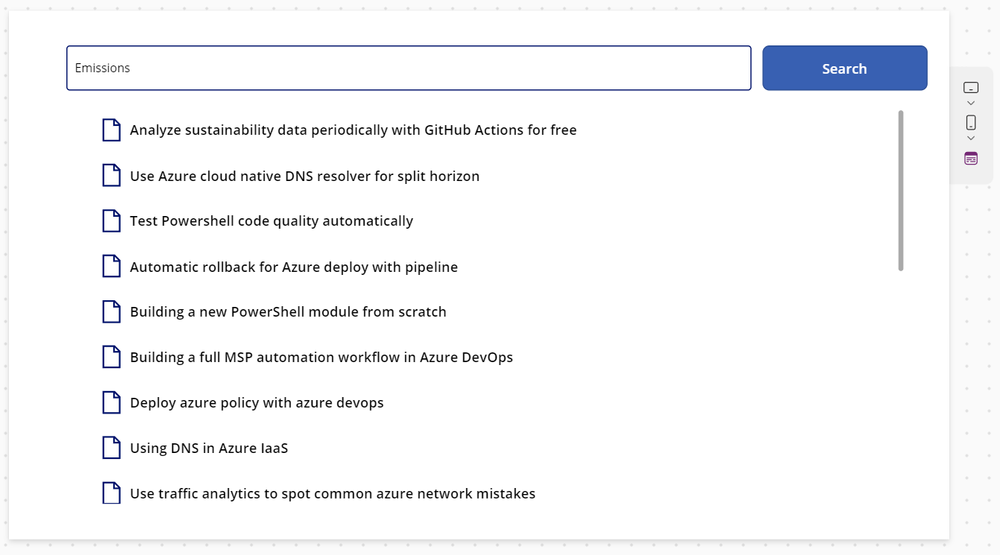
This will open my blog with the proper page using the launch function. As text for the button I’ve used the title. This way when someone enters a value in the input field and presses the search button it will show the results like this:

By clicking on the text a new tab will open with the specific blogpost.
Do keep in mind that this requires the use of the HTTP trigger in a flow which is triggers by your Power App so it will require a premium license. There is also a preview version of the Azure AI Search connector for the Power Platform which you could use instead of the http connector. It’s still a premium connector. I didn’t use it as it was still in preview and I wanted to learn more about how this worked. But once this it out of preview I recommend using the connector instead.
I hope this has given you some insight in how you can use this AI Search option inside your power apps.

