[Launched] Generally Available: Route-maps for Azure Virtual WAN
April 16, 2025
Using the Graph Explorer for user CRUD in Azure AD B2C and Entra External ID
April 16, 2025
I’m making a conscious effort to deepen my knowledge on Semantic Kernel, and I just want an easy way to access LLMs and SLMs without having to go through Azure OpenAI (and pay for it). GitHub Models provides a number of AI models that you can use to build GenAI applications, particularly within Semantic Kernel.
Semantic Kernel provides a lightweight framework for us to build AI applications and agents that use LLMs and other cloud services. Using Semantic Kernel, we can define workflows, apply reasoning over LLM outputs, and create complex AI workflows.
To see this in action, let’s build a basic C# application that uses Semantic Kernel and GitHub Models.
Installing Semantic Kernel
I’m going to use the dotnet CLI to create a console app, and install the necessary NuGet packages that we’ll need. To create our console application, we can use the dotnet new command:
dotnet new console --name SemanticKernelGitHubModels
Once the project has been created, navigate into the project folder and install the following NuGet packages with these commands:
dotnet add package Microsoft.SemanticKernel
dotnet add package Microsoft.Extensions.Configuration.UserSecrets
Generating a PAT token for GitHub Models
To use GitHub Models we’ll need to generate a GitHub Personal Access Token. Within the GitHub Models marketplace, we can choose the model that we want to use, and generate our token from there.
For this demo, I’m going to use OpenAI’s GPT-4.1 model (Which came out today). You can search for it within the search bar if you have trouble finding it:
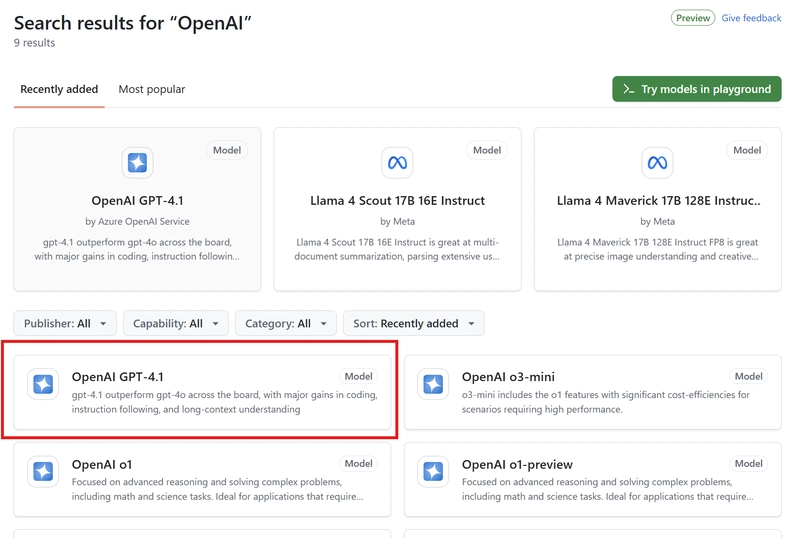
Click on the model, and then click Use this model. Under Create a personal access token, you’ll want to click Get developer key which will use the free GitHub Model instead of using Azure AI:
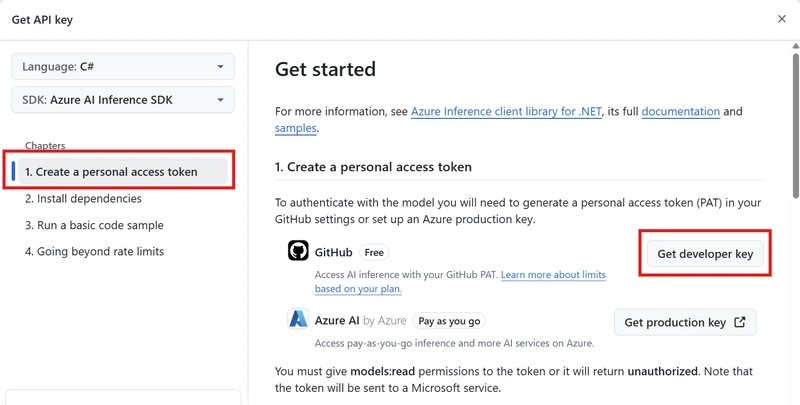
Under Create personal access token, we’ll want to create a New fine-grained personal access token. Give your token a name, and under Permissions, set the Models access to Read-only. This will allow access to GitHub Models. Click Generate Token to create the token:

This will create the PAT token, which you should copy as you won’t be able to see it again after you navigate away from GitHub.
Creating our Chat Bot
Back in your terminal, we can now use User Secrets to store our GitHub PAT Token. To do this, run the following in your project directory:
dotnet user-secrets init
dotnet user-secrets set "GH_PAT" ""
Now we can start building our console application. Open up your C# project and write the following:
// Use User Secrets for our configuration
var config = new ConfigurationBuilder()
    .AddUserSecrets<Program>()
    .Build();
// Set the model to gpt-4.1
var modelId = "gpt-4.1";
// Set the model endpoint
var uri = "https://models.inference.ai.azure.com";
// Set our PAT Token to the `githubPAT` variable
var githubPAT = config["GH_PAT"];

// Create a client to our GitHub Model
var client = new OpenAIClient(new ApiKeyCredential(githubPAT), new OpenAIClientOptions
{
    Endpoint = new Uri(uri)
});

// Create a chat completion service
var builder = Kernel.CreateBuilder();
builder.AddOpenAIChatCompletion(modelId, client);

// Get the chat completion service
Kernel kernel = builder.Build();
var chat = kernel.GetRequiredService<IChatCompletionService>();
This code is pretty straightforward, but let’s break it down line by line:
// Use User Secrets for our configuration
var config = new ConfigurationBuilder()
    .AddUserSecrets<Program>()
    .Build();
This line:
- Creates a configuration object using ConfigurationBuilder.
- Adds user secrets (a secure way to store sensitive data like API keys) scoped to the Program class.
- Builds the configuration object to access stored secrets.
// Set the model to gpt-4.1
var modelId = "gpt-4.1";
// Set the model endpoint
var uri = "https://models.inference.ai.azure.com";
// Set our PAT Token to the `githubPAT` variable
var githubPAT = config["GH_PAT"];
These variables:
- Specifies the model for the OpenAI GPT 4.1 model to be used.
- Defines the endpoint for our GitHub Model.
- Retrieves the PAT token from our User Secrets by using the
"GH_PAT"key.
// Create a client to our GitHub Model
var client = new OpenAIClient(new ApiKeyCredential(githubPAT), new OpenAIClientOptions
{
    Endpoint = new Uri(uri)
});
We then create an instance of OpenAIClient to interact with the OpenAI model, use the ApiKeyCredential class to use our PAT token, and configure the client using the GitHub Model endpoint.
// Create a chat completion service
var builder = Kernel.CreateBuilder();
builder.AddOpenAIChatCompletion(modelId, client);

// Get the chat completion service
Kernel kernel = builder.Build();
var chat = kernel.GetRequiredService<IChatCompletionService>();
Finally, we then initialize a KernelBuilder object to configure and build a Kernel instance. We then add OpenAI’s chat completion service to the kernel using our model and OpenAI client using the .AddOpenAIChatCompletion() method.
We then build the Kernel instance with the configured services and retrieve the ChatCompletionService, which we will use to create a basic chat application like so:
var history = new ChatHistory();
history.AddSystemMessage("You are a useful gym chatbot. You will limit your answers to purely gym-related topics. Any other topics, " +
    "or you don't know an answer, say 'I'm sorry, I can't help with that!'");

while (true)
{
    Console.Write("Q: ");
    var userQ = Console.ReadLine();
    if (string.IsNullOrEmpty(userQ))
    {
        break;
    }
    history.AddUserMessage(userQ);

    var sb = new StringBuilder();
    var result = chat.GetStreamingChatMessageContentsAsync(history);
    Console.Write("AI: ");
    await foreach (var item in result)
    {
        sb.Append(item);
        Console.Write(item.Content);
    }
    Console.WriteLine();

    history.AddAssistantMessage(sb.ToString());
}
We start off by creating a new instance of ChatHistory to maintain the conversation context between us (the user), and the chatbot.
I’ve added a system message to the ChatHistory to instruct the chatbot to act as a gym-related assistant. If it’s asked any other questions, it should respond with I’m sorry, I can’t help with that!.
I’ve then used a while loop that will handle user input and give us a way to ask the LLM questions through our console app.
Running our Chat Bot
Let’s test this out! Use dotnet run to run the application and feel free to ask it some questions!
Like all gym bros, my legs are the weakest part of my game 🥲 So let’s see if GPT 4.1 has any recommendations to help me with that:
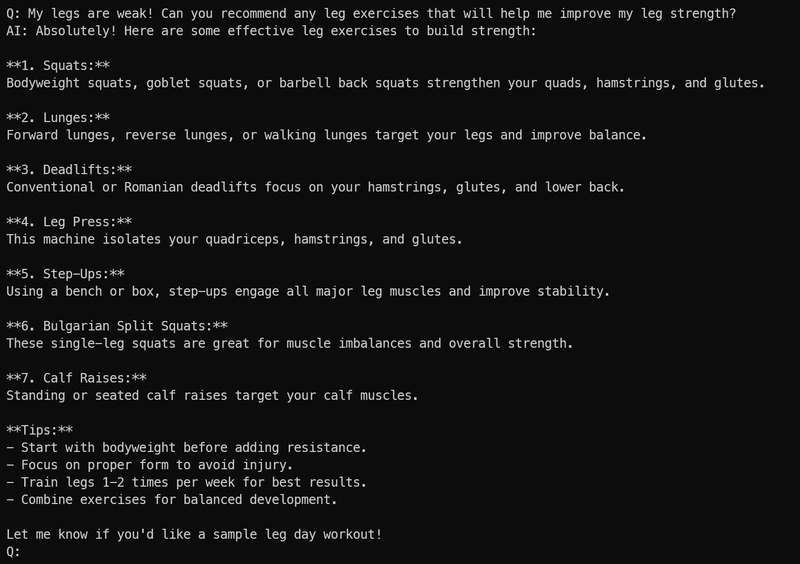
As you can see, it’s responded with some leg exercises that I could incorporate into my workout routine. Let’s change the topic and ask our new chatbot what the meaning of life is (I mean, who HASN’T pondered that in the gym at some stage in their life?)

No such luck with that one 🥲
Now I’m pretty sure that any LLM could take a crack at the meaning of life IF you wanted it to, but since we’ve instructed our bot not to answer any non-gym related questions, it’s responded with “I’m sorry, I can’t help with that” as we’ve told it to.
(As always, verify output from GenAI and don’t take the advice to heart too literally. After all, you wouldn’t change the direction of your life based on probability-based predictions of text……would you?)
Conclusion
Anyway – GitHub models provide us with a free way to test LLMs and SLMs that we can integrate with our Semantic Kernel applications! Hopefully this makes your development efforts a little easier when developing GenAI applications, rather than having to create an Azure OpenAI instance, or sign up for paid keys from OpenAI itself.
If you have any questions about this, please feel free to either comment below or reach out to me on BlueSky!
Until next time, Happy coding! 🤓🖥️