Using Act to Test GitHub Workflows Locally for Azure Deployments (CI/CD)
May 16, 2025AI assisted code conversion copilot for Oracle-to-SQL Migrations
May 16, 2025
Hello again folks! Recently, I’ve been working with some far more intelligent peers (such as my buddy Jose Medina Gomez, you should definitely check out his repos because he has some awesome stuff there) on getting some new-to-Azure customers up and running in the GenAI (generative AI) space. Specifically, these customers had some custom data they wanted to use the LLMs (large language models) to reason on and answer questions about. This called for using a RAG (retrieval-augmented generation) pattern to provide an LLM access to an external knowledge base. I thought it would be helpful to other folks out there like myself that are new to this world to document some simple patterns to do this type of stuff that keep security in mind. I’ll cover these over a few posts with this being the first.
The Pattern
The first pattern I want to cover is what I call the “Microsoft public backbone” pattern. This pattern is ideal for customers to minimal to no Azure presence who need something up and running quickly with some basic security guardrails. The pattern looks like what you see below:
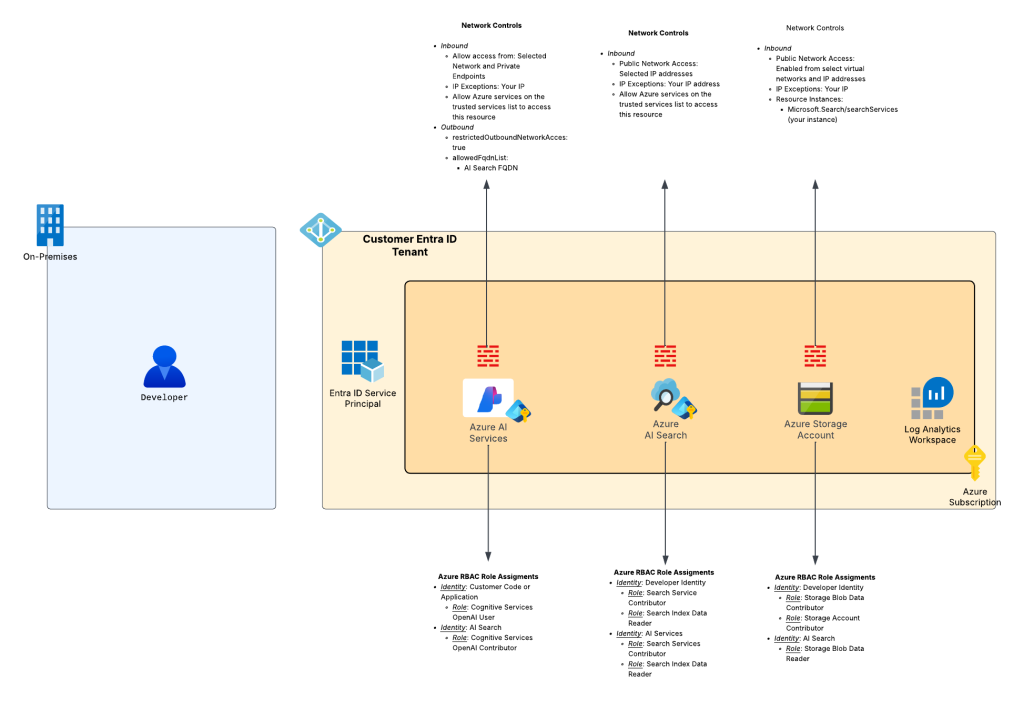
The key benefits of this pattern are:
- All traffic between Microsoft PaaS (platform-as-a-service) services flows over the Microsoft public backbone and the organization’s application communicates with the services over the Microsoft public backbone.
- All Microsoft PaaS services use the built-in service firewall to control inbound traffic.
- Microsoft PaaS services that support outbound network controls use those controls to mitigate the risk of data exfiltration.
- Authentication between each component uses Entra ID based authentication and Azure RBAC authorization.
- Minimizes costs by choosing more affordable SKUs where possible.
- Captures logs where available.
What I like about this pattern is it is super simple to get up and running (can take less than one hour) and provides decent security controls with minimal headache. It’s by no means production-ready pattern for reasons I’ll discuss further in this post, but for a quick proof-of-concept or for getting your feet wet with RAG-like patterns, this is a great choice.
I’ll now spend a few moments providing detail to each of the benefits I outlined above.
The Benefits and Considerations
Benefit 1: All traffic between Microsoft PaaS (platform-as-a-service) services flows over the Microsoft public backbone and the organization’s application communicates with the services over the Microsoft public backbone
Simplicity is the name of the game here folks. By keeping keeping all communication to the Microsoft public backbone you avoid the complexities of Private Link integration. For organizations that are new to Azure and don’t have a platform landing zone (hybrid connectivity, network inspection, Internet egress support for Azure resources, DNS forwarding for Private Link) this pattern can be done without much effort. As an added benefit, PaaS to PaaS stays over the Microsoft public backbone providing you with the the security controls Microsoft provides across their public backbone.
Benefit 2: All Microsoft PaaS services use the built-in service firewall to control inbound traffic
Almost all (I’m sure there are some exceptions that aren’t top of mind) Microsoft PaaS services provide a basic built-in firewall I refer to as the service firewall. The service firewall is off by default, but can be toggled on to restrict inbound traffic to the public endpoint for the PaaS (which ever PaaS has). Most commonly (every PaaS service seems to work a bit differently) you can create exceptions to the firewall based on IP address or allow “trusted” Microsoft services to bypass the firewall. Additionally, Azure Storage has is its capability which allows to configure specific resource instances to bypass the firewall based on the resource instance identifier and its managed identity.
The “trusted” Microsoft service exception needs a bit more explaining. Most Azure PaaS (again, there are always exceptions because Microsoft loves its snowflakes) has a checkbox in the Portal with text like seen in the screenshot below. This checkbox allows traffic from a specific set of Azure services (identified by their public IP addresses) to bypass the service firewall. Today, this will be a box you will often need to check whenever you are doing PaaS to PaaS. The key thing to understand about this checkbox is it’s all public IPs associated with whatever the “trusted” services are the specific product group identifies. This means instances not owned by you could be allowed to bypass the service firewall (making authentication and authorization critical). Thankfully, the upcoming Network Security Perimeters feature will likely address this gap and make this box something of the past.

Benefit 3: Microsoft PaaS services that support outbound network controls use those controls to mitigate the risk of data exfiltration
While controlling inbound traffic for a PaaS is typically a Private Endpoint or service firewall (or eventually Network Security Perimeters) use case, controlling outbound traffic tends a bit a bit more tricky. For many compute-based services (AKS, App Services, Azure Container Services, etc) you are able to force outbound traffic through your virtual network allowing you to get visibility into the traffic and control what that service can make outbound network connections to.
With PaaS services like the ones used in this architecture, these types of virtual network integration aren’t an option. For most non-compute-based PaaS you are essentially SOL (I’ll let you figure out this acronym yourself). The services that fall under the Cognitive Services framework (such as Azure OpenAI Service and AI Services) support outbound traffic controls. You can check out my prior post for the details on those controls. In this architecture we use Azure OpenAI Services so we can take advantage of those outbound controls.

Controlling outbound access from a PaaS will be another place Network Security Perimeters will become the predominant control mechanism.
Benefit 4: Authentication between each component uses Entra ID based authentication and Azure RBAC authorization
In this pattern Entra ID-based authentication and Azure RBAC authorization is used at each hop for human-to-service and service-to-service communication. Users interacting with these service will use their Entra ID user identities which are typically synchronized from an on-premises Windows Active Directory. Non-humans (applications and services) will use Entra ID service principals to authenticate to each other. This will either be a standard service principal, identified by a client id and client secret (for you AWS folks this is essentially your IAM User), or a special type of service principal called a managed identity (for those of you coming from AWS, this is as close to an IAM Role as Azure gets).
Azure RBAC roles are assigned with least privilege in mind. Users (or groups) are assigned the minimal permissions they need to upload data to the storage account and perform needed functions with the PaaS to load and query the data. Services are provided the necessary permissions they need to interact.
Benefit 5: Minimizes costs by choosing more affordable SKUs where possible
Costs are already pretty cheap with this pattern. This pattern minimizes costs further by sacrificing the Shared Private Access feature of AI Search. Yeah, you lose on the fuzzy feeling of the communication between AI Search and Azure Storage or Azure OpenAI Service happening over Private Link, but you save some money with the more basic SKU and still get the security of the Microsoft public backbone and the service firewalls.
Note that this design choice is made to optimize costs. Performance within the Basic SKU may not be sufficient for your use case.
Benefit 6: Captures logs where available
Finally, let’s look at logging. In this pattern you’ll get your management plane activities (actions on the resources) via Azure Activity Logs and you’ll get data plane (actions on the data held by the resources) activities via diagnostic settings delivering logs to a Log Analytics Workspace.
Each of these resources has a selection of logs available. Some are “ok” (Azure OpenAI Service) and some are “meh” (Azure AI Search). However, you will want all of these logs for both security and operational use.
The Considerations
There can’t only be benefits, right? The major considerations of this pattern is it’s very much built for proof-of-concept. You get basic network security controls with the service firewall, but no inspection of traffic unless you have an inspection point on-premises in front of the developer. Additionally, before communication from the developer gets to Azure it will have to traverse the public Internet before it gets to the Microsoft public backbone. While all of your communication will happen over TLS, you don’t get the security benefits of wrapping that encrypted session with an IPSec tunnel or funneling it over a known path and operational benefits of consistent latency with ExpressRoute.
Scalability of AI Search is another consideration. The Basic SKU will offer you a limited amount of scale.
On the LLM front, this pattern only allows you to deploy models available within an Azure OpenAI Service (or AI Services) instance (thanks to Jose for highlighting this consideration). There are options to adjust this pattern to use other LLMs, but it will require the introduction of AI Foundry which is quite the beast.
There are likely others I’m missing, but this is still a great little pattern to see what the LLMs can do that comes wrapped with decent security controls and requires minimal coding.
Loading Data
So you’ve decided that the benefits and considerations make sense to you and you want to move ahead, or maybe you’re just dipping your toes into this world and you want to muck around with things. Now you’re left wondering, “Ok I set this thing up like you documented above, how the heck do I use it?”
Alrighty, I’m going to show you the the quick and dirty way. Do not assume the way I’m going to show you is the only way to do this pattern. There are lots of variations, especially on how you chunk and load the data into AI Search. My advice to you in that department would be to work with the data folks at your organization or engage a Microsoft solutions architect on the optimal way to chunk and load your data. Do it wrong, and the responses from the LLMs will be crappy. After watching my buddy Jose and many of his peers, it’s very much an art form that requires experience and experimentation.
For the less experienced folks like myself, there is a built-in wizard within AI Search that helps to chunk and vectorize the data. If you open the Azure Portal you’ll see an option called Import and Vectorize as seen in the screenshot below.

Clicking that option will open up the wizard (yes Microsoft still loves its wizards). On the first screen you’ll select the Azure Blob Storage option. On the next screen you’ll configure the options below. If you’ve set things up as I’ve outlined them in the initial pattern diagram (RBAC and network controls) this will work like a champ (don’t forget to deploy a chat model like gpt-4o and embedding model like text-embedding-3-large to the AOAI (Azure OpenAI Service) instance). I’m assuming you already created a container in the Azure Storage account and uploaded data (like some PDFs). I’ve found this useful when referencing and consuming RFCs to confirm my understanding.
Here you’re specifying that the AI Search instance grab the data you’ve uploaded to the blob container using its system-assigned managed identity.

The next screen provides us with the options to vectorize (or create embeddings) for our data. We can then use AI Search to query both the text-based chunks and vectors to optimize the results we return to the LLM. Here I’m selecting to use an embedding model deployed to an Azure OpenAI instance. More advanced scenarios you may choose to incorporate other embeddings you’ve built yourself or sourced from the model marketplace and deployed to AI Foundry (thanks to Jose for mentioning this).
I also select to use the deployed text-embedding-3-large embedding model and am again using the AI Search managed identity to call the Azure OpenAI service to create the embeddings.

The data I’m using (10K financial reports) doesn’t have any images so I ignore the Vectorize and enrich your images option.
Finally, I opt to use the semantic ranker (great article on this) to improve the results of my queries to AI Search and leave the other options as the default since this is a one time operation. If you are doing this regularly, getting a good data pipeline in place (either push or pull) is mission critical (another learning from my buddy Jose). Someone smarter than me can help you with that.
Review the settings and opt to create the indexer. The full run will only take a few minutes if you don’t have a ton of content. For larger data volume, get yourself some coffee and work on something else while you wait. If you have any failures at this step, it will likely be you don’t have the networking controls setup correctly. Review the image I posted at the beginning of this post and get busy with the resource logs (it’s good experience!).

Once it’s complete, you’ll see a screen like this if you select the indexer that was created. It will will show you how many of the docs it pulled from the container and how many were successfully imaged.

Next you can navigate to the index and run a test search. Here you’ll get back the relevant records and you can muck around with direct searches against the index to get a feel for the structure of the chunked data. If you don’t get an responses it’s likely an RBAC or networking issue. For RBAC, ensure you granted yourself both management plane (Search Service Contributor) and data plane (Search Data Index Reader or Contributor).

Chatting with your data
Alright, your data has been pulled into AI Search. How do you go about extending this knowledge base to the LLM? There are a ton of ways to do it, but for something quick and dirty, I’m a fan of either writing some simple Python code or using the Chat Playground via your Azure OpenAI Services or AI Services instance. For this blog, I’m going to be lazy and focus on the latter.
For this you’ll want to navigate to the AOAI instance and select the “Explore Azure AI Foundry portal” link. No this isn’t actually AI Foundry and is instead the rebranded (and standardized) Azure OpenAI Playground incorporated into a Foundry-like interface.

Once entering the new portal you’ll be dropped into the Chat playground. Here you’ll want to use the Add your data link and then Add a data source link as seen below.

On the next screen I choose to add the index I created earlier during my data import also choosing to use vector-based searches to improve the quality of the search results returned to the LLM. This is where the embedding model I deployed earlier comes into play as seen in the image below.

On the next screen I opt to do a hybrid + semantic search to ensure I get the best results out of a typical keyword search, vector search, and semantic search. A default semantic search configuration was created for you when you imported the data into AI Search.

Lastly, I choose to use the system-assigned managed identity of the AOAI instances when calls are made from the AOAI instance to AI Search. This is where the Azure RBAC assignments I show in the original diagram come into play. Any missing permissions on the managed identity will pop up for you here during the validation stage.

After saving and closing I’m good to go! In the chat window I can ask a question such as “How many shares did Microsoft buy back in 2024?” The LLM optimizes my query for AI Search, creates vector-based embeddings of my question, performs the hybrid and semantic search against the AI Search instance, summarizes the results, and returns them to the Chat Playground.

Below you see the answer to my question with citations back to the original chunked data in AI Search. Cool shit right?

If you’re just dipping your toes into this world or you’re an organization validating that the Azure platform’s AI Services can do what you need them to do before you invest heavily into the platform, this is a great pattern to mess around with. It’s super easy to get up and running, doesn’t require a deep understanding of Azure, and still provides foundational security controls that every organization should have in place. All this in a quick few hours of work.
In upcoming posts I’ll showcase some variations of this pattern such as the incorporation of Private Link and using CoPilot Studio as a frontend to build a quick and simple Teams bot using a small variation of this pattern (this was a really fun one Denis Rougeau, Aga Shirazi, Jose and I have been rolling out to a few customers. Super excited to talk more about that one!).
Until next time!